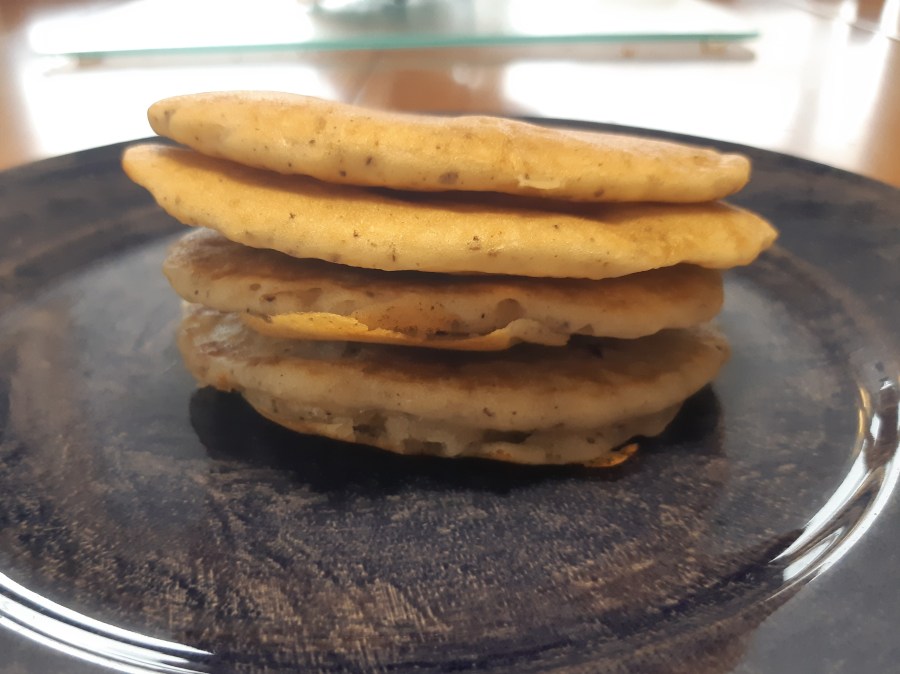
I have been making this recipe for almost 2 years and my family can’t get enough. I have made it many different ways with different flours, with and without eggs, different butter/oils etc. I hope you can enjoy these as much as my family does.
So this recipe is amazing. Somehow it works no matter what substitutes I have made to it. It seriously is the perfect recipe! I definitely recommend trying it.
Ingredients 1 1/2 C flour + more if needed, gluten free if needed (I use my Gluten Free No ‘Gum’ Flour Mix) (1) 3 1/2 tsp baking powder (or 1 tsp baking soda and 3 tsp apple cider vinegar) (2) 1 tsp sea salt 1 Tbsp cane sugar 1 1/4 C milk/milk replacer (I use light coconut milk) 1 egg/egg replacer (I use a flax egg [1 Tbsp flaxseed meal, 2 Tbsp warm water]) (3) 3 Tbsp butter/vegan butter/coconut oil, melted (I use miyokos butter) (4)
Directions
Make flax eggs (omit if using regular eggs) in small bowl by combining flaxseed meal and water, mix and let sit for 5 min.
In a large bowl whisk together flour, baking powder (or baking soda), salt and sugar. Make a well in center.
Combine the milk, egg/egg replacer, melted butter/oil (and apple cider vinegar if using).
Pour the liquid ingredients into the well in the dry ingredients, mixing until smooth. If using Gluten Free No ‘Gum’ Flour you will likely need to add an additional 1/4 C of flour so it isn’t too runny.
Heat a lightly oiled griddle/frying pan over medium high heat. Pour or scoop batter onto the pan, about 1/4 C for each pancake. I make smaller pancakes for my toddler. Brown on both sides, serve hot and enjoy.
Freeze extra pancakes in a sealed bag or container, reheat and enjoy
Notes (1) Gluten Free Flour: Gluten allergy – If you are using a standard 1:1 gluten free flour mix, such as my Gluten Free All Purpose Flour, that has psyllium husk fibre/xanthan gum, it will cause your batter to be quite thick. You will need to spread the pancakes out on the pan. If using my Gluten Free No ‘Gum’ Flour, you will need to add an additional 1/4 C approximately. (2) Baking Powder: Corn & Grape Allergy – Baking powder is not corn free. Find corn-free if need be. Cream of tartar is made from grapes, if you have a grape allergy; you just need 1/4 of powder for baking soda and remainder in apple cider vinegar (3) Egg: Corn allergy – Eggs are washed with a commercial cleaner that is full of corn products. The egg shells are porous and absorb the cleaner, so many with corn allergies have issues with eggs. Less common is to have issues with eggs due to what the chickens are eating. Egg Replacer: Corn allergy – I have found that many of the egg replacers out there use corn starch, so beware which one you buy. (4) Butter: Dairy & Corn Allergy – Depending on allergies use whatever butter you need. There are several options: MELT, Earth Balance, Miyoko’s, coconut oil, goat butter). Beware of salt in butter if corn allergic (look for sea salt/unsalted), also be careful of the diet of the cows. Many vegan butter have corn derivatives.
A fantastic, simple flour mix great for delicate things such as pancakes, crepes, puddings or to use in recipes to control the amount of binding ingredient (psyllium husk/xanthan gum) in a delicate cake recipe such as sponge cake or champagne cake. Also great in gravies or sauces.
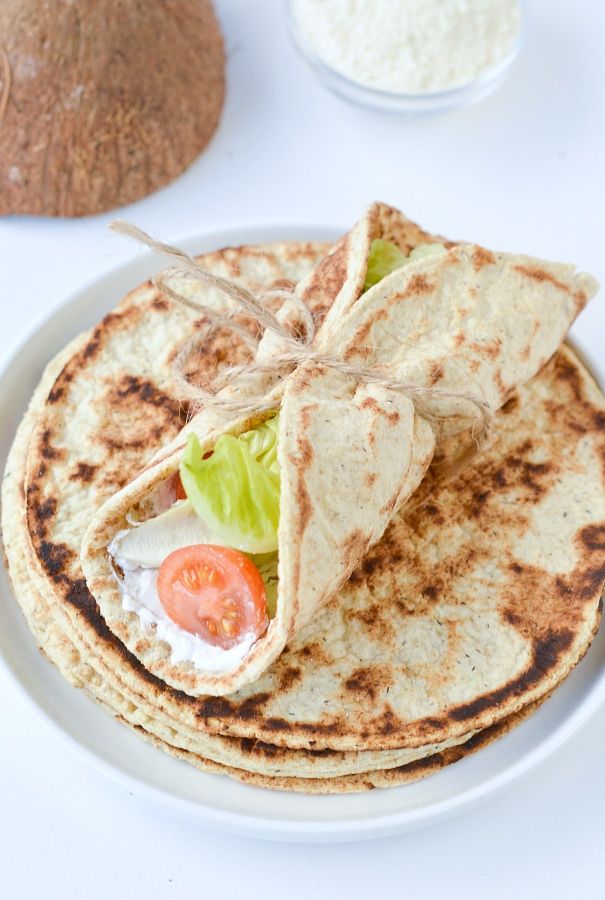
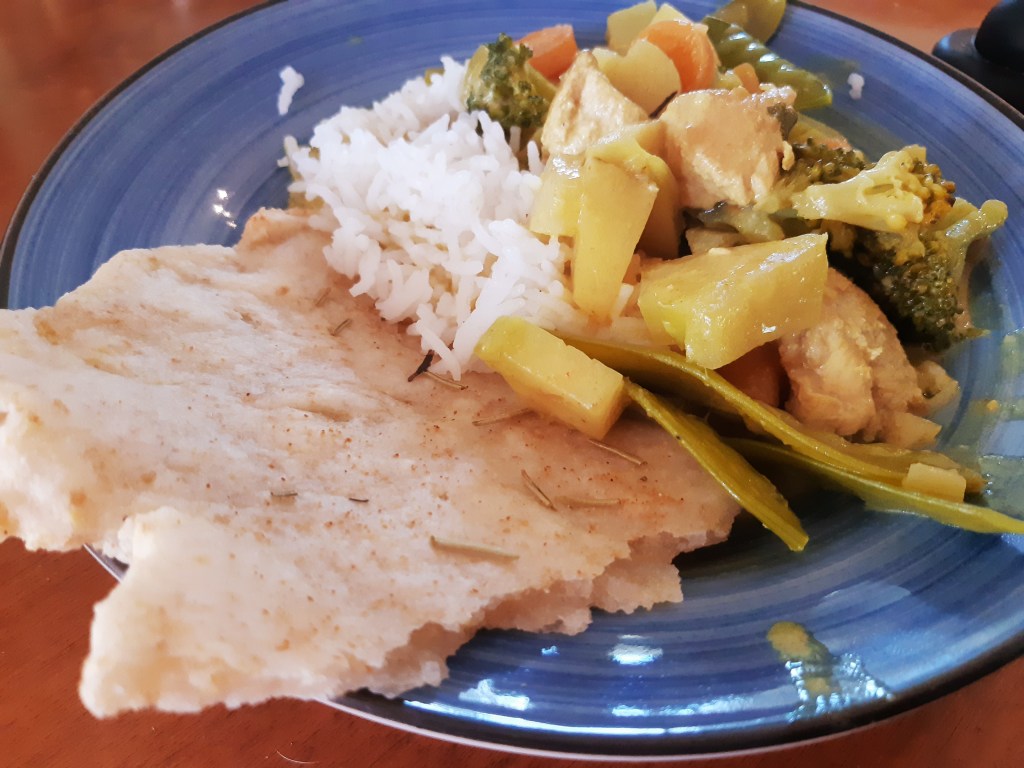
Anyone that has tried gluten free tortillas knows that all the ones in the store are dry, the break & crumble, and honestly they don’t taste that great either.
I miss the soft texture that rolls and folds without cracking at the seams and breaking into pieces.
When we could no longer eat anything with xanthan gum in it, that meant that pretty much all store bought tortillas were off limits for our family. Unfortunately that also meant no more wraps, tacos or other delicious meals.
I tried a bunch of options, and I know there are other great recipes out there, but this one is super simple with minimal ingredients. It stays soft for 5 days in sealed container in the fridge, they only split from over stuffing and not from just folding it over. They are soft and have a similar texture to wheat tortillas. Are they exactly the same? No. But that’s ok. They are delicious.
I have tried this recipe plain as well as with Italian seasoning in it. I am planning on making a spinach tortilla and potentially a tomato flavored one in the future, I’ll be sure to update the recipe and let you know how they turn out!
Ingredients 2 Tbsp psyllium husk fibre 1/2 C coconut flour 1 C lukewarm water 1 Tbsp oil (olive, coconut [melted] etc.) + 1 tsp to oil pan 1/4 tsp baking soda 1/4 tsp sea salt (optional) 1/2 tsp Italian seasoning or other flavoring (optional)
Directions Make the dough
In a medium mixing bowl combine psyllium husk fibre with coconut flour (ensure no lumps in coconut flour)
Add the lukewarm water, oil and baking soda. Stir well with a spatula then knead well with your hands. Add in salt and seasoning if desired at this time (adding salt separate from baking soda to prevent deactivating the leavening agent).
Knead for 1 minute. It will be quite moist and get dryer and softer as you work the dough. It shouldn’t be sticking to your hands at the end of the 60 seconds. If it is, add 1/2 tsp more psyllium husk at a time, kneading for 30 seconds and check consistency. It should still be moist but not sticking to your fingers and form a dough.
Set aside for 10 minutes in the bowl. It should now be soft, elastic and well together.
Roll/Shape the tortilla
Cut the dough into 4 even pieces, rolling each into a ball.
Place one ball of dough between 2 pieces of parchment paper, rolling out to desired thickness. I roll mine to be 8 inches in diameter and to make 6 tortillas.
Unpeel top layer of the parchment paper and use a lid/small plate to cut out a round tortilla. Keep the outside scrap to reform a ball and roll more tortillas. This extra dough makes roughly 2 more tortillas (to make 6 total).
Cook in non stick pan
Warm a non stick pan (best to use a crepe/pancake pan, I use a normal frying pan) under medium high heat.
Grease the pan with oil of choice (don’t leave drops of oil or the tortillas will fry)
Flip the tortilla onto the pan and carefully remove the parchment paper. This can take some finesse/trial and error.
Cook for 2-3 minutes on first side, flip using a spatula and cook for 1-2 more minutes on the other side.
Place on a plate and use warm for tacos or allow to cool for a wrap later.
Repeat the rolling/shaping and cooking steps for remaining tortillas. Ensure you grease the pan between each tortilla.
Store in the fridge up to 5 days in sealed container or 3 days on the counter. Freeze if desired for long term storage.
I hope your family can enjoy these tortillas for tacos or for wraps, I know my family downs them.
I have used this recipe for quite some time and honestly they are absolutely fantastic. They are crispy on the outside and fluffy on the inside. The best part, only flour is oat! No mixing of flours! This makes it easy for others to accommodate for family with allergies I find.
This recipe isn’t huge, a single batch yields 3-4 round, 7 inch belgian waffles or 6 small, square belgian waffles. I often triple the recipe and freeze my leftovers to quickly warm up.
Ingredients 1 1/2 C oat flour, certified gluten free if necessary 2 tsp baking powder (or 1/2 tsp baking soda and 1 1/2 tsp apple cider vinegar) (1) 1/2 tsp salt (2) Pinch of cinnamon (optional) 3/4 C room temperature milk of choice (we use light coconut milk) 1/4 C + 1 Tbsp melted coconut oil or 5 Tbsp unsalted butter, melted (we use Miyokos) 2 flax eggs (2 Tbsp flaxseed meal, 4 Tbsp warm water) or 2 large eggs 2 Tbsp maple syrup 1 tsp vanilla extract (3)
Directions
Make flax eggs (omit if using regular eggs) in small bowl
In a mixing bowl whisk the dry ingredients together: oat flour, baking powder (or baking soda), salt, and cinnamon.
In another bowl whisk the wet ingredients: milk, melted coconut oil or butter, eggs, maple syrup, vanilla extract (and apple cider vinegar if using). If coconut oil solidifies on contact with cold ingredients gently heat the wet mixture in the microwave in 10 second intervals until melted again.
Pour the wet ingredients into the dry ingredients. Stir with a spatula or spoon until just combined (it will still be slightly lumpy). Rest for 10 minutes (allows oat flour to absorb the moisture). Plug in the waffle iron to preheat now. Set dial to medium-high if temperature/browning dial (ours is setting 5)
Once 10 minutes is completed, swirl batter one final time and pour batter into waffle iron & close the lid. Once the waffle is deeply golden and crispy transfer to a cooling rack or baking sheet. Don’t stack your waffles on top of each other or they lose their crispiness.
Keep warm if desired in a 200 degree oven until ready to serve.
Repeat with remaining batter
Freeze leftover waffles in freezer safe plastic bags, place in toaster or microwave to warm up to eat.
Notes (1) Baking powder: Corn & Grape Allergy – Baking powder is not corn free. Find corn-free if need be. Cream of tartar is made from grapes, if you have a grape allergy; you just need 1/4 of powder for baking soda and remainder in apple cider vinegar (2) Salt: Corn Allergy – Many that are allergic to corn are sensitive to iodized salt as corn is used in the processing. Sea salt is better, but some are still quite sensitive. (3) Vanilla: Corn Allergy – Vanilla is made with alcohol, often corn, you may need to make your own
I am excited to share one of our favorite snacks in our house. Granola bars. Simple, easy and so versatile. It is so easy to change this recipe to suite dietary restrictions and preferences. I have yet to make these nut free, but I am sure you could just do more rolled oats in place of the nuts and it would turn out perfect. As long as you balance the dry with the liquid, these will turn out fantastic!
For this recipe, there is a base recipe, and then there are your optional add-ins. I have decided to separate and make it two separate recipes, so make sure you don’t just print or look at the Mix-Ins portion!
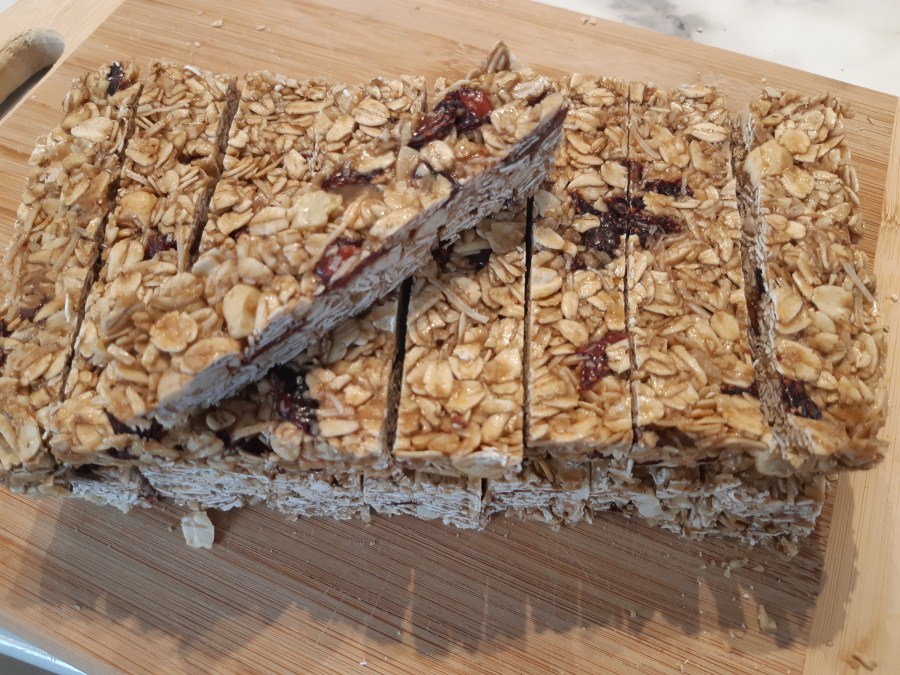
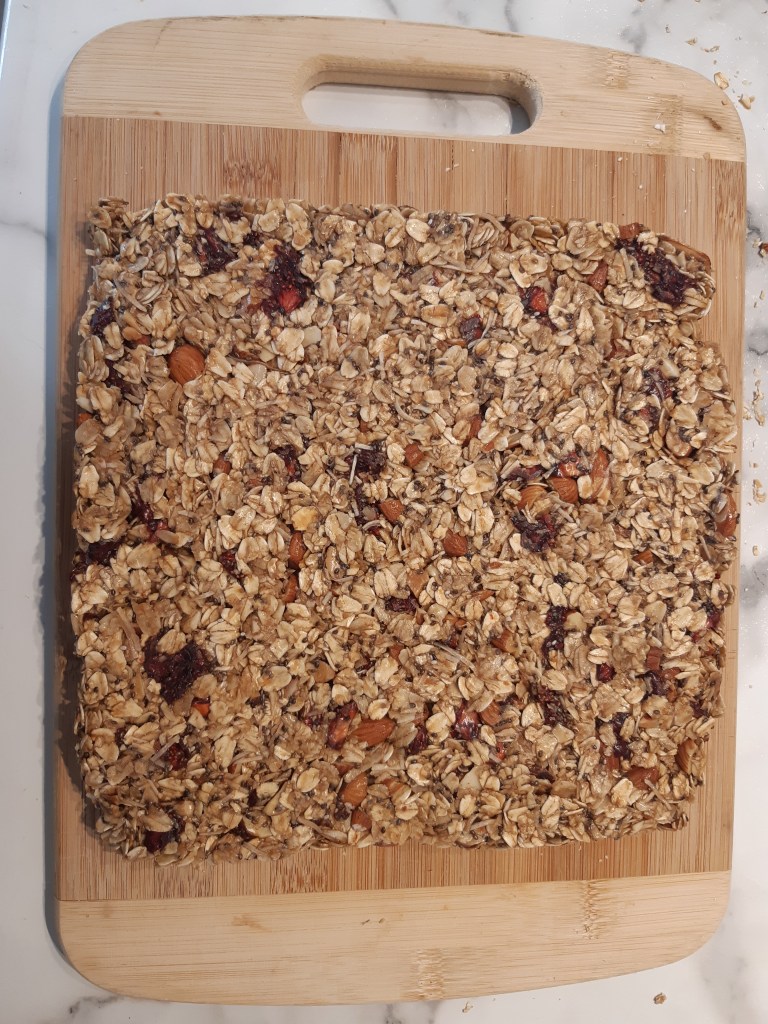
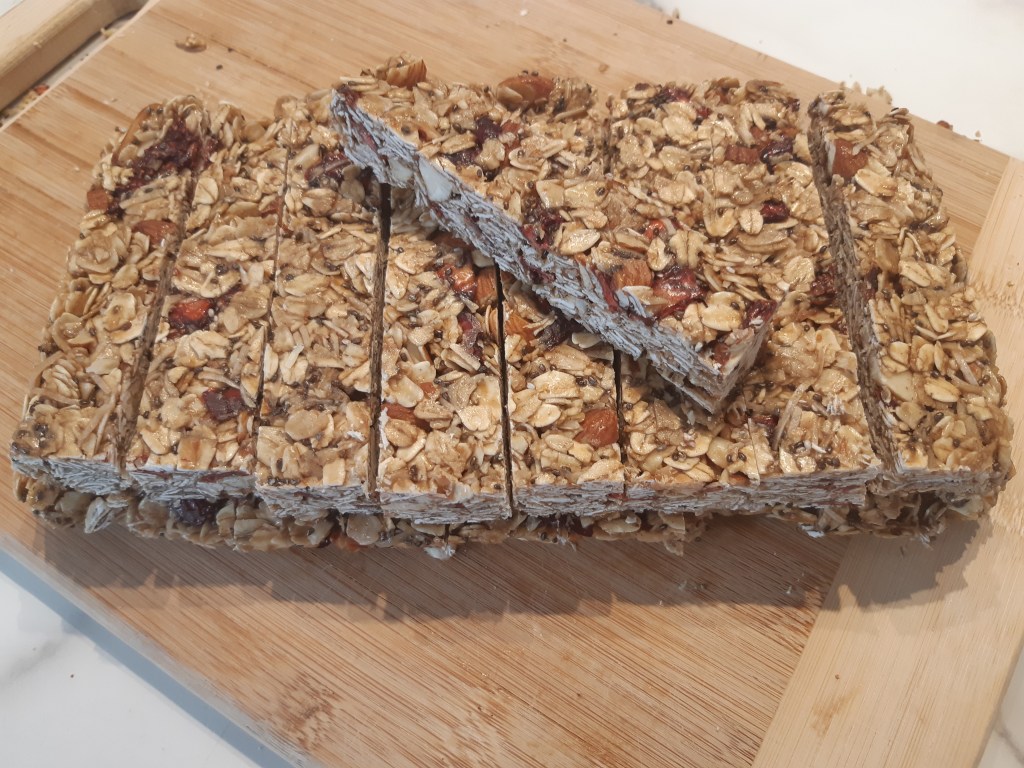
What the mix should look like when pressing into panCooled at least 2 hours in the fridge (this was overnight)What they look like sliced and ready to eat
2 1/2 C old fashioned rolled oats 1/2 C nuts, roughly chopped (1) 1/4 C honey (2) 1/4 C unsalted butter (or alternative, we use miyokos) (3) 1/3 C brown sugar/coconut palm sugar (4) 1 tsp vanilla extract (5) 1/4 tsp salt (6) 3/4 C total extra mix-ins (see Mix Ins – Granola Bar Recipe below)
Directions
Preheat oven to 350 degrees. Line 9 inch square baking dish with parchment paper, make big enough to completely fold over the top of the tray
Place the oats & nuts on a baking sheet and bake for 8-10 min until lightly toasted, place in large bowl.
While oats are toasting, add the honey, butter & brown sugar to a small saucepan. Cook over medium heat until butter is melted and the sugar is dissolved, stir occasionally.
Remove from heat & stir in vanilla and salt.
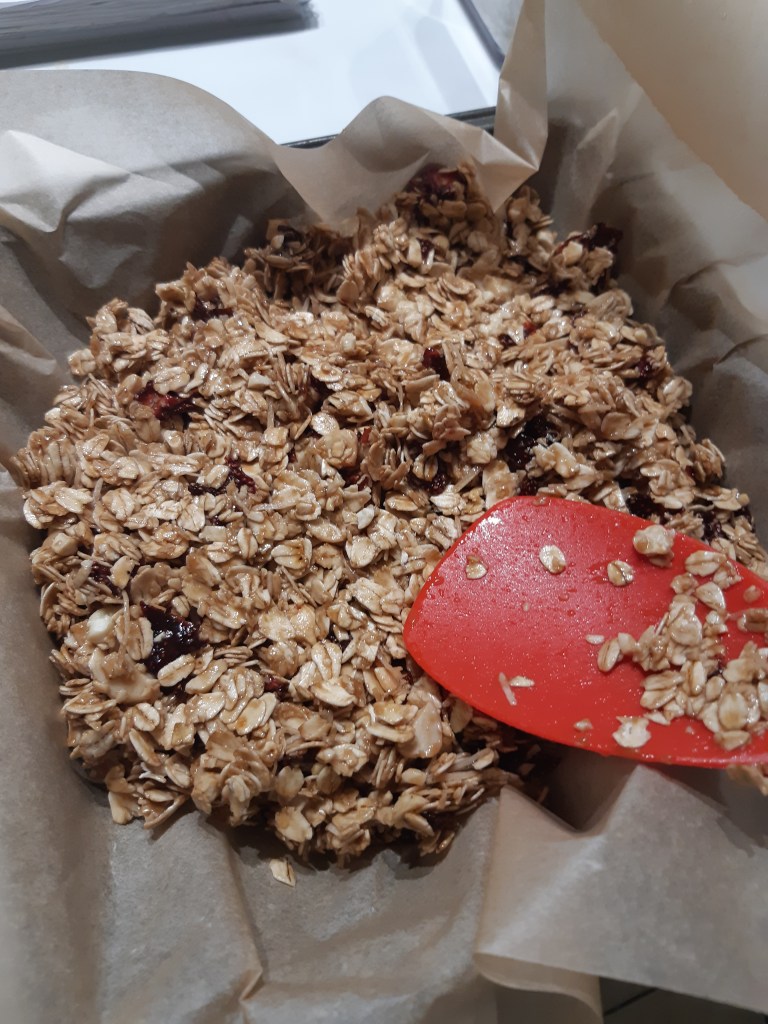
Pour over the oat mixture, stir to combine. Add mix-ins, except chocolate & mix well to ensure well coated.
If adding chocolate, wait about 15 minutes for the mixture to cool slightly, then combine.
Place in prepared baking sheet. Using a rubber/silicone spatula press the mixture into the pan, spreading around evenly. Fold parchment over & press with your whole body weight to ensure it is well compressed throughout.
Chill for at least 2 hours or overnight. Remove from pan by lifting parchment, place on cutting board and cut to desired shapes with sharp knife. Allowing to warm for several minutes before slicing can ensure cleaner lines. Enjoy
Store in sealed package. If sticking together, separate with plastic or parchment. Refrigerate or freeze extras and remove as needed every couple of days.
Notes
(1) Nuts: Corn Allergy – depending on how they are pasteurized, pest control, processed/washed & cross contamination in facilities as well as in the store are all things to consider if quite sensitive. (2) Honey: Corn Allergy – Purity of the honey itself is important to ensure. Some beekeepers use corn syrup as a supplemental food in the winter months, getting cross contaminated with sourced honey. Sprays for illness, proximity to corn fields & whether the honeycombs are made of corn wax instead of beeswax all need to be considered. (3) Butter: Dairy & Corn Allergy – Depending on allergies use whatever butter you need. There are several options: MELT, Earth Balance, Miyoko’s, coconut oil, goat butter). Beware of salt in butter if corn allergic (look for sea salt/unsalted). Many of vegan butter have corn derivatives. (4) Brown Sugar: Corn Allergy – depending on sensitivity, you may need to make your own with safe molasses and sugar. Alternatives include coconut palm sugar. (5) Vanilla: Corn Allergy – Vanilla is made with alcohol, often corn, you may need to make your own (6) Salt: Corn Allergy – Many that are allergic to corn are sensitive to iodized salt as corn is used in the processing. Sea salt is better, but some are still quite sensitive and require specific safe brands
Directions Select the desired type of granola bar from the “Mix-Ins” recipe and add to Base Granola Bar Recipe as desired. The nut option is the 1/2 C described in the base recipe. These are only suggestions that we use, change to your hearts content.
Mix-Ins Strawberry: Master + almond + 1/2 C dried strawberries + 1/4 C shredded coconut + 1/2 tsp cinnamon (add with vanilla) + 2 Tbsp chia seeds [optional]
Blueberry: Master + almond + 1/2 C dried blueberries + 1/4 C shredded coconut
Dark Chocolate: Master + pecans + 1/2 C dried cherries + 1/4 C mini chocolate chips
Tropical: Master + cashew + 1/2 C chopped dried fruit (pineapple, mango, orange, peach) + 1/4 C shredded coconut
White Chocolate Cranberry: Master + almond + 1/4 C dried cranberries + 1/4 C sunflower seeds + 1/4 C white chocolate chips
Peanut Butter Chocolate: Master + 1/4 C peanut butter (add with vanilla) + 1/2 C M&Ms + 1/4 C mini chocolate chips
Sunflower Almond: Master + almond + 1/2 C sunflower + 1/4 C shredded coconut + 1/2 tsp cinnamon (add with vanilla)
Sunflower Chocolate Almond: Master + almond + 1/4 C sunflower + 1/4 C shredded coconut + 1/4 C chocolate chips
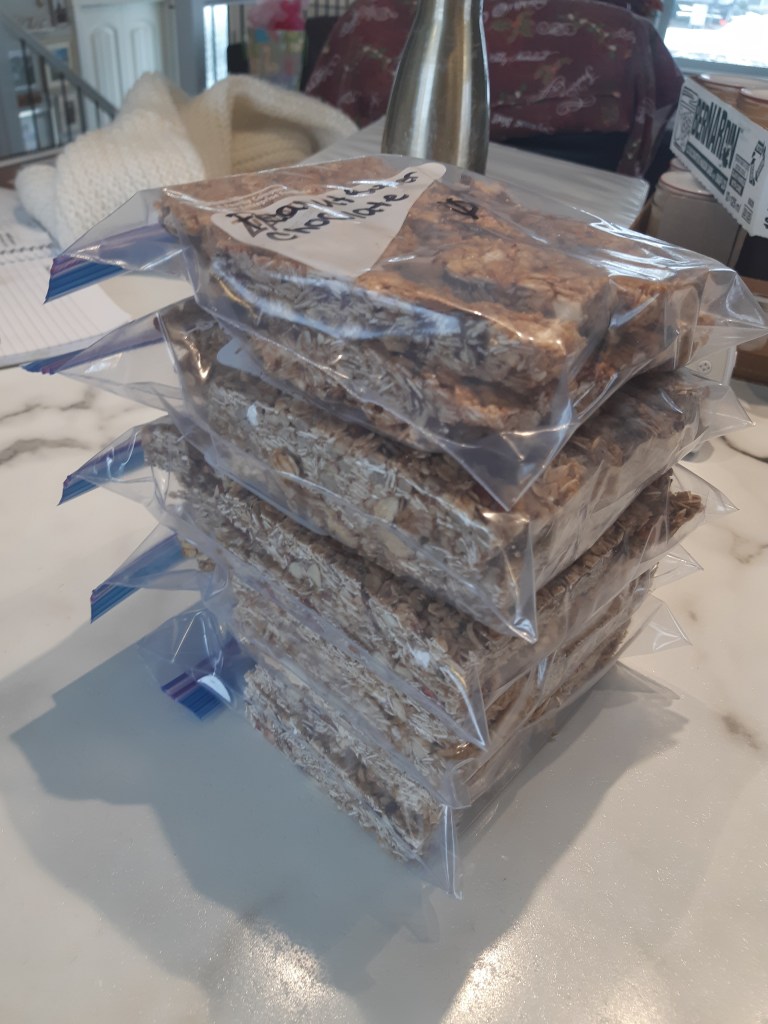
How I package to go into the freezer. Just pull out a few at a time to put in a bag or container on the counter, allow to warm to room temperature and enjoy!
I hope that your families can enjoy these as much as we do!
I used to work at OPA, the fast food restaurant, when I was younger, and even though I couldn’t eat their pita wraps, I salivated over them daily. I just never considered making my own.
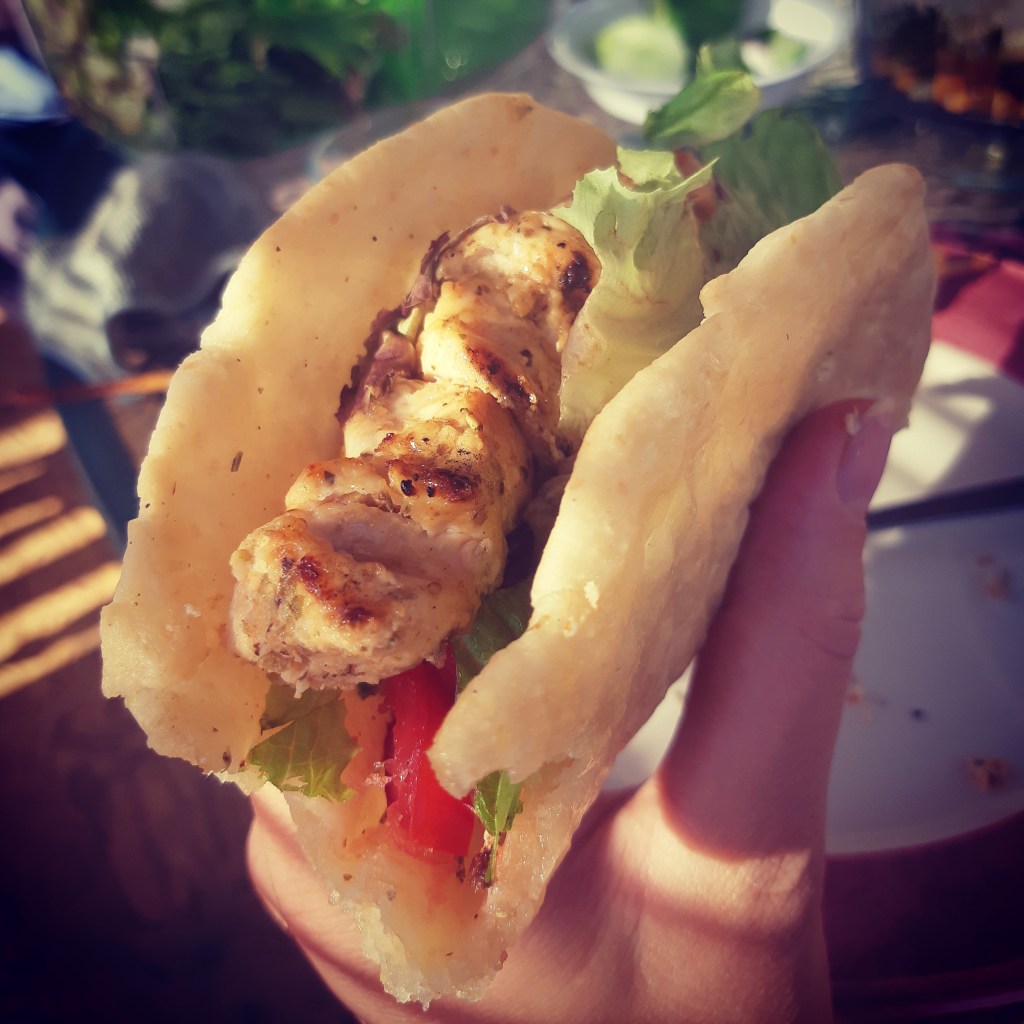
You could just make the chicken souvlaki from this recipe, as it is pretty delicious, but I recommend trying it in a wrap as well!
2 1/2 lbs boneless skinless chicken breast cut into 1″ cubes 10 garlic cloves, peeled 2 Tbsp dried oregano 1 tsp dried rosemary 1 tsp paprika 1 tsp sea salt 1 tsp black pepper 1/4 C olive oil or coconut oil 1/4 C dry white wine or apple cider vinegar Juice of 1 lemon 2 bay leaves
Pita Fixings
Pita bread (I used my Grain Free Garlic Rosemary Flatbread) Tzatziki sauce (I didn’t use any sauce and it still tasted delicious) Fresh veggies (tomatoes, cucumber, onions, olives, lettuce, spinach, radish, peppers etc.)
Directions
In a small food processor, add garlic, oregano, rosemary, paprika, salt, pepper, oil, wine/vinegar & lemon juice (do NOT add the dried bay leaves at this point). Pulse until well combined.
Place chicken in a bowl, add the bay leaves. Add the marinade & mix well. Cover and refrigerate for 2 hrs or overnight. I used our marinating food processor adapter.
Soak 10-12 wooden skewers in water for 30-45 minutes.
When ready, thread marinated chicken onto the prepared skewers.
Prepare grill, brush the grates with a little oil and heat over medium-high heat. Place chicken on the grill until well browned & internal temperature register 155 degrees F. Be sure to turn skewers evenly to cook on all sides.
Let rest for 3 minutes & serve. (Take chicken off skewers if making a wrap.
I had this recipe kicking around from 5 years ago and recently remembered it. Why I stopped making it, I couldn’t tell you. So delicious, simple and easy.
Delicious and easy flatbread that you wont be able to stop eating. Great as a side, a pita for a wrap, or dipping in oil and vinegar.
Ingredients
1 C tapioca flour 1/4 C coconut flour, sifted if there are clumps 1/2 tsp sea salt 1/2 C full fat coconut milk 1/4 C coconut oil 1 egg or egg replacer (I use 1 Tbsp golden flax seed meal + 2 Tbsp warm water, sit for 5 minutes) 1/4 tsp finely chopped dried rosemary 1/2 tsp garlic powder
Directions
1. Preheat oven to 450 F. Place pizza stone in oven to heat up (optional, I use a cookie sheet without issues) 2. Gently heat up coconut milk and oil in a small sauce pan until very warm but not boiling. 3. Whisk tapioca flour, coconut flour, and salt in a large bowl. Pour the coconut milk/oil mixture on top. Mix thoroughly until combined. Allow to cool for several minutes and allow the coconut flour to absorb. 4. Add beaten egg/egg replacer and mix again until fully combined. 5. Remove pan from oven, cover in parchment paper and pour mixture into the center. Using a spatula spread out the dough until 1/4 inch thick. I have shaped them into rounds to act like a pita in a wrap as well, you just may need a second pan as it fills one standard cookie sheet normally. 6. Season with garlic and rosemary, place in oven for 9-12 minutes, depending on how crisp you want it. 7. Serve!
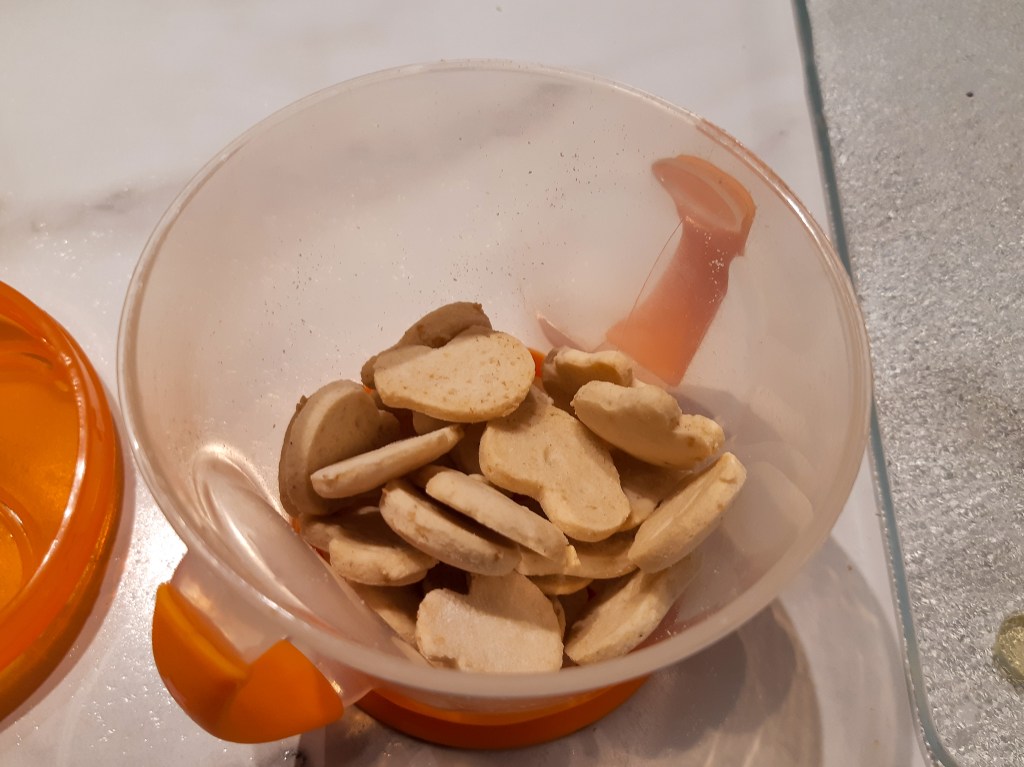
I have been meaning to share this recipe for a while as my family loves them. I try to make them at least once a month, but I have started making bigger batches and freezing them (not quite as good, but pretty close).
These are relatively simple, but time consuming as you do have to cut out each animal cracker individually. I find that the dough is a tad bit sticky, so it takes a bit of work to get your extra flour for rolling and prevent sticking to your cookie cutters.
I use little cutouts that I got off of amazon that are actually meant for fruit, veggies and cookies. Super little and super cute. You can use whatever shapes you want, I love making them in shapes my daughter recognizes like bunny ears or fish etc, but circles work just as good. I like them small as they are great for little fingers (a little bit bigger than my thumbnail is my go to).
I have used several different flour mixes and I have found the one on the link the best: Gluten Free Baking Mix.
Gluten Free Vegan Animal Crackers
Servings: 200 small crackers, 90 standard animal crackers
Ingredients 1 1/3 C Gluten Free Baking Mix flour 1/8 tsp baking soda (1) 1/4 tsp salt (2) Pinch of nutmeg 1/4 C vegan butter, room temp. (I use miyokos butter) (3) 3 Tbsp unsweetened applesauce, room temp. 1/3 C cane sugar 1 Tbsp flaxseed meal + 2 Tbsp warm water (thickened for 5 minutes) (I use golden flaxseed meal so it isn’t visible in my baking) 1/2 tsp vanilla extract (4) 3/8 tsp apple cider vinegar (ACV) or lemon juice (1)
Directions 1. In a small bowl whisk together the dry ingredients (flour, baking soda, salt, nutmeg), set aside. 2. In a large bowl vigorously whip the butter with the back of your fork until fluffy (2 minutes). Add the applesauce and sugar. Fluff until well mixed (another minute). Add the flax “egg”, vanilla and apple cider vinegar/lemon juice and whisk until blended in. 3. Add the dry ingredients slowly into the wet ingredients as you stir to make a nice cookie dough 4. Divide into 3 balls and chill in the fridge for at least 1 hour (I wrap each ball individually in saran wrap to prevent drying out). 5. Preheat oven to 350 degrees. Line baking sheet with parchment paper 6. Between 2 pieces of parchment paper, roll out one ball of dough until 1/4″ thick. Using mini animal cookie cutters cut out your cookies. 7. Carefully transfer to the baking sheet and bake for 8-10 minutes, just until the edges begin to lightly brown. 8. Allow to cool on a wire rack, enjoy. Will store in an airtight container for up to 1 week on the counter. Freeze in airtight container for longer lasting crackers, take out prior to enjoying.
Notes (1) Baking soda & apple cider vinegar: This is a substitute for 1/2 tsp baking powder. Corn & Grape Allergy – Baking powder is not corn free. Find corn-free if need be. Cream of tartar is made from grapes, if you have a grape allergy; you just need 1/4 of powder for baking soda and remainder in apple cider vinegar (2) Salt: Corn Allergy – Many that are allergic to corn are sensitive to iodized salt as corn is used in the processing. Sea salt is better, but some are still quite sensitive. (3) Butter: Dairy & Corn Allergy – Depending on allergies use whatever butter you need. There are several options: MELT, Earth Balance, Miyoko’s, coconut oil, goat butter). Beware of salt in butter if corn allergic (look for sea salt/unsalted). Many of vegan butter have corn derivatives. (4) Vanilla: Corn Allergy – Vanilla is made with alcohol, often corn, you may need to make your own
The last day in February is Rare Disease Day, a day to bring awareness to the general public about rare diseases affecting many people’s lives. What I didn’t know until we had V and researched Rare Disease Day, is that 1/20 people will live with a rare disease at some point in their life.
Despite how many are affected, most of these diseases actually have a small group affecting each specific disease, having no cure and most of the time actually go undiagnosed. We celebrate rare disease day on the last day in February, a month with a rare number of days.
So what is a rare disease?
“There are over 300 million people living with one or more of over 6,000 identified rare diseases around the world, each supported by family, friends and a team of carers that make up the rare disease community. Each rare disease may only affect a handful of people, scattered around the world, but taken together the number of people directly affected is equivalent to the population of the world’s third largest country. Rare diseases currently affect 3.5% – 5.9% of the worldwide population. 70% of those genetic rare diseases start in childhood. 72% of rare diseases are genetic whilst others are the result of infections (bacterial or viral), allergies and environmental causes, or are degenerative and proliferative.” (1)
What are the challenges with a rare disease?
Due to such a lack in scientific knowledge and quality information of each disease there are often delays in getting a correct diagnosis. The lack of information also delays appropriate interventions and treatment, causing additional burdens on those affected. Due to the rarity and diversity within each disease, it is so important for research done to be international so that all researchers, experts and clinicians are connected and able to collaborate more effectively and efficiently. There are several initiatives, including the International Rare Disease Consortium, the European Reference Network, Care 4 Rare (this is a Canadian run program), and EU Framework Programme for Research and Innovation Horizon 2020, that support international, collaborative work.
How will Rare Disease Day help make a difference?
Rare disease day helps to bring awareness to the 300 million people living with a rare disease around the world, and other loved ones affected as well.
“The long-term cause of the Rare Disease Day campaign is to achieve equitable access to diagnosis, treatment, health and social care and social opportunity for people affected by a rare disease.”(1)
At the start of Rare Disease Day in 2008, 18 countries held events, and in 2019 over 100 countries brought awareness to rare diseases by holding events. This is exciting progress.
So how does this affect our family?
As mentioned in a previous post The terrors of being a NICU parent, our daughter was diagnosed with Incontinentia Pigmenti, a rare congenital condition that affects her X chromosomes. This in turn affects her skin, hair, teeth, microvasculature (including her eyes), and central nervous system. What I haven’t mentioned is that only 1200 people with this condition have been reported in scientific literature. Current prevalence being 0.6-2.1/1,000,000 persons, which is a 0.00006%-0.00021% of the population on earth. (2)
At 6 months of age V was also diagnosed with a rare allergy condition called FPIES (food protein induced enterocolitis syndrome). It is a non-IgE allergy affecting her gastrointestinal system. It causes vomiting to the risk of hypovolemic shock, abdominal pain, and bleeding with diarrhea. Most outgrow this condition by the age of 3, however a small number live with this allergy for life. From numbers I could find, FPIES is estimated to affect 0.28% of children in the United States currently. Due to frequent misdiagnosis this number is likely low. (3)
Living with a Rare Disease
Living with a rare disease has so many complicated facets. Not only is there little information out there, many doctors don’t know or understand the condition. I go to our family doctor and tell her what I want/need, not the other way around. She actually told me the last time I was in that I am the expert, not her. What is scary about this, is what if a doctor doesn’t agree with what my daughter needs? What if we go to the emergency room needing specific care and they don’t agree with what she needs and ignore our concerns? Things can go from scary to downright dangerous.
Support groups are our life. I have so many support groups, yes on facebook, but they have made our life so much simpler and safer. There is so much information each of us as parents have researched and discovered, so why not share? Obviously it is important to trust your source and do research as necessary to confirm what was stated or suggested, but I have learned so much about new updated protocols to follow, food suggestions and tips on dealing with IP and FPIES in the hospital setting. Due to all of this advice, we were safely able to navigate surgery for V this past January, you can read about it here. These support groups also are so important for ones mental health. It is easier to shelter yourself and your child when someone in your family is affected by a rare disease or allergy. It is easy to just stay home than to go out, risking your child, worrying about an innumerable amount of risks, trying to explain yourself and your child numerous times. It is so much simpler to shelter oneself. I have found support, people I can vent to, people that understand. It also makes it easier to go out because of advice given.
For many with a rare disease, or really any disease, life is more expensive. We celebrate daily that we live in Canada, where most of our medical expenses are covered by the health care system. Unfortunately this isn’t the case for many across the world. Sadly, our health care does not include FPIES or any allergies under a tax exemption for food expenses. Depending on severity of a condition, it can become very expensive to support the one in your life with said restriction. For us, corn is debilitating. Everything we eat needs to be locally sourced from specific farmers, with specific farming practices. This includes butchering practice and packaging of all food products. Suffice to say, it puts a strain on ones budget.
There are of course the struggles if ones family is not supportive and you have not only no help, but judgement too. Judgement as to treatment options, lifestyle changes, things they can do to help etc.
For many with a rare disease they are undergoing medical treatment that is new, joining medical trials, trying medication after medication. There is often no end to the disease and the start of ones day. So how do you live with a disease and not let it define your life? For everyone that looks so different.
For our family, it means trying to make meals as normal as possible, even if our ingredients are limited. It also means scheduling doctor appointments around our life, rather life around the doctor appointments. We bring food with us to go out instead of just staying home as we can’t eat out. Some struggles we haven’t come across yet, like how we will approach dangerous sports (increased risk for retinal detachment) or for V later in making decisions about having a family (as IP is hereditary and often causes miscarriages).
I encourage you all to read up about a loved ones disease, rare or not, and know how you can support them. Whether they are in need of financial support for programs, help with just staying on top of their house (due to an even busier schedule than most) or even just taking them out for coffee and listening. Trust me, when loved ones research and are able to participate in a conversation about the condition, bring forward suggestions or ideas and overall just are there, it means a lot!