Peach Scones with Honey Vanilla Glaze

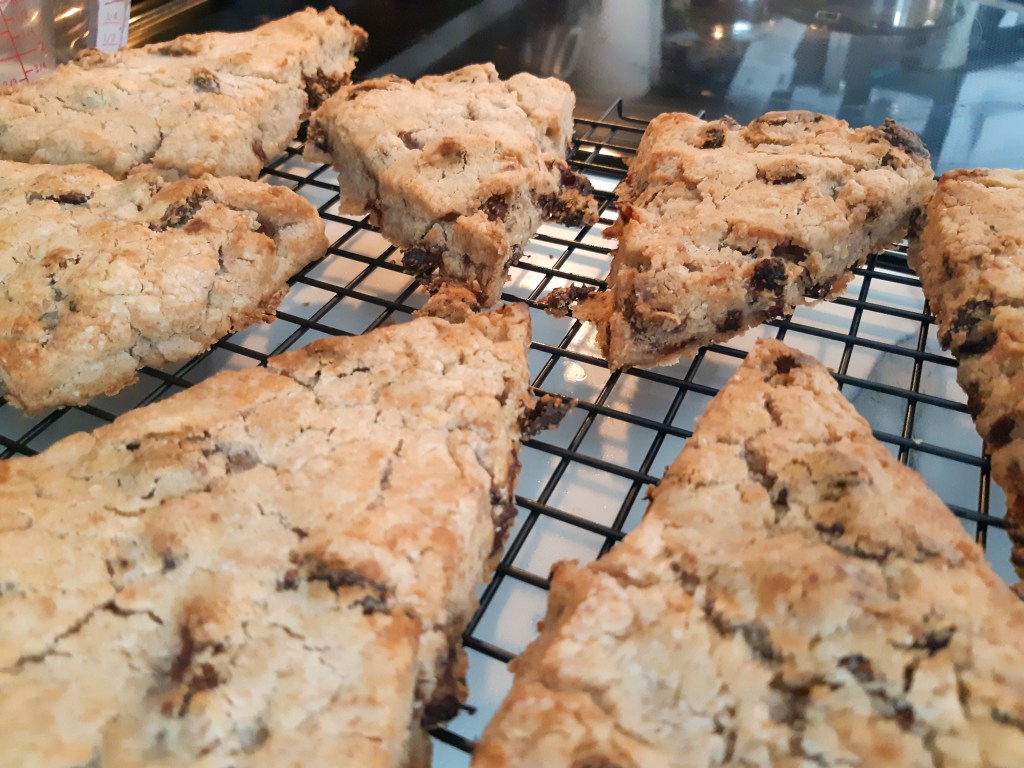
I am a huge fan of brunch, and what is a brunch without fresh scones?

Made with fresh peach scones from summer

I have made this recipe many times, it has turned out soft, fluffy and delicious every time. Most recently I made strawberry scones from dehydrated strawberry pieces I had from this summer, and it was to die for. Almost as good as fresh, I just had to rehydrate the strawberry pieces in hot water for 5 minutes.

Strawberry scones made with home-dehydrated strawberry pieces

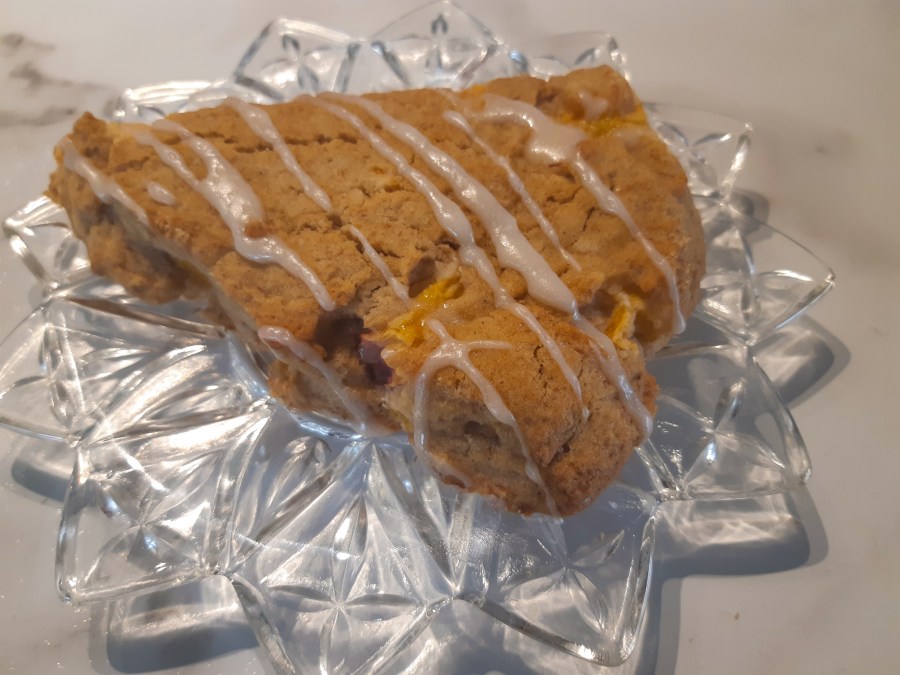
Peach Scones with a Honey Vanilla Glaze

  • Servings: 8
  • Print

Delicious, fluffy, buttery scones with fresh peaches or other desired fruit and finished with a delicious honey glaze.

Ingredients

Scones:
2 C all purpose flour/gluten free flour (I use my Gluten Free All Purpose Flour)
3 Tbsp cane sugar
1 Tbsp baking powder (or 3/4 tsp baking soda and 2 1/4 tsp apple cider vinegar) (1)
1/2 tsp ground cinnamon
1/2 tsp salt (2)
6 Tbsp unsalted butter/vegan butter/coconut oil, cold, in 1/4 inch cubes (3)
1 C heavy cream/full fat coconut milk + 1 Tbsp to brush on the scones (4)
1/2 tsp vanilla extract (5)
1 C diced fresh peeled peaches/strawberries (or rehydrated fruit)

Glaze:
1 C icing sugar (6)
1 Tbsp honey
1/2 tsp vanilla extract (5)
2 Tbsp milk/milk alternative (4)

Directions

  1. Line a baking sheet with a Silpat baking mat or parchment paper, set aside.
  2. In a large bowl whisk together flour, sugar, baking powder (or baking soda if using), cinnamon and salt.
  3. Use a pastry blender to quickly cut the cold butter into the flour mixture. Mix until it resembles coarse meal with a few large butter lumps.
  4. In a small bowl whisk together 1 C cream, vanilla extract and apple cider vinegar (if using). Pour liquid ingredients over the flour mixture, stir with spatula until dough begins to form. Don’t over mix. Fold in the fruit gently.
  5. Transfer dough to the Silpat, slightly floured, and knead by hand just until it forms a ball. Do not overwork the dough.
  6. Form scones by patting the dough into a 1 inch thick circle Use a sharp knife to cute into 8 triangles.
  7. Place tray in freezer for 15-20 minutes. Meanwhile preheat the oven to 400 degrees F.
  8. Remove the scones from the freezer, lightly brush with additional heavy cream. Bake for 18-23 minutes, or until scones are golden brown on the bottom and edges.
  9. Cool on the baking sheet for 5 minutes, then transfer to a wire cooling rack.
  10. While cooling, make the honey vanilla glaze by whisking the sugar, honey, vanilla and milk together. Drizzle the glaze over the cooled scones. Serve.

Notes
(1) Baking Powder: Corn & Grape Allergy – Baking powder is not corn free. Find corn-free if need be. Cream of tartar is made from grapes, if you have a grape allergy; you just need 1/4 of powder for baking soda and remainder in apple cider vinegar
(2) Salt: Corn Allergy – Many that are allergic to corn are sensitive to iodized salt as corn is used in the processing. Sea salt is better, but some are still quite sensitive and require brand specific salt.
(3) Butter: Dairy & Corn Allergy – Depending on allergies use whatever butter you need. There are several options: MELTEarth BalanceMiyoko’s, coconut oil, goat butter). Beware of salt in butter if corn allergic (look for sea salt/unsalted), also be careful of the diet of the cows. Many of vegan butter have corn derivatives.
(4) Coconut Milk: Corn allergy – ensure coconut milk is additive free
(5) Vanilla: Corn Allergy – Vanilla is made with alcohol, often corn, you may need to make your own
(6) Powdered sugar: Corn Allergy – Powdered sugar/icing sugar contains cornstarch to prevent clumping. Wholesome Organic Icing Sugar uses tapioca starch instead. This is an ok option for corn lite, but trial carefully as there is a lot of cross contamination. It is possible to make your own. This is what we do, it is just time consuming.

Chicken Nuggets

Chicken nuggets are one of those easy meals that are so nice to have in the freezer, ready for a simple fries night or a quick lunch. Life with kids makes simple easy meals a necessity. For those with little ones with allergies you know how difficult it is to find safe meals like this.

I was desperate for easy finger food to add to fries night which we often have twice a month, and everything I made V didn’t like. Breaded chicken tenders were a huge no from her. I tried several chicken nugget styles and recipes. Baked just wasn’t working either, no one liked them. And then I found this recipe. I have made it from straight ground chicken, but you can start with the chicken breasts as well.

Chicken Nuggets

  • Servings: 42 nuggets
  • Print

An easy alternative to the chicken nuggets you find in the store, but you actually know exactly what is in them.

Ingredients
18 oz boneless skinless chicken breast/ground chicken (1)
1 1/2 tsp salt (2)
3/4 tsp parsley flakes (3)
3/4 tsp oregano
1/4 tsp onion powder, heaping
1/4 tsp pepper, heaping
3 large eggs, beaten/flax eggs (allow to set for 5 min) (4)
1 1/2 C flour/gluten free flour (I use white rice flour)
1 1/2 tsp salt (2)
2 C deep frying oil (canola oil, sunflower oil, peanut oil etc.) (5)

Directions

  1. Whisk eggs together in a small bowl. Make flax eggs, if using. Allow to set for 5 min. I found the flax egg mixture was slightly too thick, add more water if needed.
  2. Combine flour and salt and put in a shallow bowl.
  3. Heat oil in a heavy-duty skillet or saucepan on medium-high heat. Set a candy thermometer in place. Keep an eye on the temperature to avoid burning your oil.
  4. While oil is heating, cut chicken breast into cubes and whir in a food processor until a fine paste, or use ground chicken. Combine chicken with salt, parsley, oregano, onion powder and pepper in a medium size bowl.
  5. Make 42 balls with the chicken mixture, about 1 Tbsp per.
  6. Roll ball in flour, then coat in egg, then recoat in flour. Use your fingers to press ball down to flatten into a nugget.
  7. Once oil is 350-365 degrees place as many nuggets into the oil as possible, frying until golden brown. Depending on depth of oil, you may need to turn halfway through. Takes approximately 7 min to fry. Use a digital meat thermometer if desired to confirm chicken is cooked fully (165 degrees).
  8. Remove and place on a towel lined plate or pan. Enjoy!
  9. Keeps in sealed container in the fridge for several days. Freezes well for easy leftovers. Reheat in the oven or microwave.

Notes:
(1) Chicken: Corn Allergy – The carcass may be sprayed with citric acid or some other anti-bacterial. The poultry may be packaged on a Styrofoam tray containing a citric acid-saturated soaker pad underneath the poultry, and then wrapped with shrinkwrap or plastic wrap. A whole chicken or turkey is usually wrapped in plastic. The inside of the packaging may contain cornstarch, to keep the poultry from sticking to the packaging. More on corn free meat processing. In addition they are typically fed corn as part of their diet.
(2) Salt: Corn Allergy – Many that are allergic to corn are sensitive to iodized salt as corn is used in the processing. Sea salt is better, but some are still quite sensitive and require brand specific salt.
(3) Spices: Corn Allergy – Dried spices can be treated with a corny preservative. Penzey’s and Frontier single ingredient spices are well tolerated.
(4) Egg/Egg replacer: Corn allergy – Eggs are washed with a commercial cleaner that is full of corn products. The egg shells are porous and absorb the cleaner, so many with corn allergies have issues with eggs. Less common is to have issues with eggs due to what the chickens are eating. I have found that many of the egg replacers out there use corn starch, so beware which one you buy. Bob’s Red Mill works as a great replacer, however it has a lot of cross contamination and isn’t recommended at all with corn allergies. You could also use a flax egg as an alternative.
(5) Vegetable oil: Corn Allergy – Don’t use “vegetable oil” as it can be corn or soy oil. Canola oil is one of the worst oils for cross contamination with corn. Olive oil isn’t always 100% olive oil either, so if you are sensitive, be careful. If bottled in plastic, the bottles can be corn-derived. The oils can be rendered corny during refining. Need to determine what is used during the extraction process (alcohol or other medium?), and if any defoaming agents are used. Citric acid can be used as a degummer as well in safflower, sunflower, canola (rapeseed), soy, and flax oil.

Gluten-free Cinnamon Sugar Baked Donuts

Ever been walking along the beachfront, or at a farmers market and pass the mini donuts truck and get a massive craving for donuts that you can’t eat due to allergies? No, just me? This is a great recipe that makes light baked gluten free donuts. Definitely a must try recipe, and relatively quick to whip up. Makes me wonder why I haven’t made them in a few years.

I don’t think I am the only one out there that has yet to get pregnancy cravings, but breastfeeding cravings, those are a definite thing in this household! I may or may not have made several batches of these recently to curb those cravings. Even better than I remember them from before.

Gluten-free Cinnamon Sugar Baked Donuts

  • Servings: 4 dozen mini donuts or 18 large donuts
  • Print

I used to make these regularly and for some strange reason I kept the recipe in my binder, unused, for several years! I recently pulled it out and make a couple new tweaks, making it better than ever.

Ingredients
Donuts:
1/4 C unsalted butter/coconut oil/vegan butter, room temperature (1)
1/4 C vegetable oil (I have used olive, coconut, and sunflower oil) (2)
1/2 C cane sugar
1/3 C brown sugar/coconut sugar (3)
2 large eggs/flax egg (allow 5 min to thicken) (4)
1 1/2 tsp vanilla (5)
2 2/3 C (320 g) gluten free all purpose flour (I use my Gluten Free All Purpose Flour)
1 1/2 tsp psyllium husk fibre/1/2 tsp xanthan gum (6)
1 1/2 tsp baking powder (or 3/8 tsp baking soda and 1 tsp apple cider vinegar) (7)
1/4 tsp baking soda
3/4 – 1 tsp ground nutmeg
2 tsp ground cinnamon
3/4 tsp salt (8)
1 C milk/milk alternative (I use coconut milk) (9)

Topping:
5 Tbsp salted butter/coconut oil/vegan butter, melted (1)
1 1/2 Tbsp cinnamon
1/2 C sugar

Directions

Donut:

  1. Preheat oven to 425 degrees. Grease donut pan (10)
  2. Using your electric mixer, cream together the butter, oil and sugars until smooth.
  3. Add the eggs, vanilla and apple cider vinegar (if using), beat until smooth.
  4. In a small bowl whisk together the flour, baking powder (or baking soda if using), baking soda, nutmeg, cinnamon, and salt.
  5. Alternate adding the flour mixture and the milk to the butter mixture, beginning and ending with flour. Mix on low until just combined.
  6. Scoop batter into a ziploc bag or a piping bag, cut off the tip/corner and begin piping the batter into the cavities of the donut pan, fill almost flush to the top of the pan.
  7. Bake at 425 degrees for 7-10 minutes until pale golden brown and toothpick comes out clean.
  8. Remove from the oven, let sit for 2-3 minutes in the pan Turn over and cool on a cooling rack.
  9. Repeat with remaining batter.
  10. While cooling, make the topping.

Topping:

  1. Melt the butter/alternative in a small bowl.
  2. In another small bowl whisk together the cinnamon and sugar.
  3. Take each cooled donut, dunk top half into melted butter and then into the cinnamon sugar mix. Place on cooling rack or tray to set, enjoy.
  4. Store in an airtight container at room temperature for 2-3 days. I haven’t tried freezing them yet, they never make it that far.

NOTES:
(1) Butter: Dairy & Corn Allergy – Depending on allergies use whatever butter you need. There are several options: MELTEarth BalanceMiyoko’s, coconut oil, goat butter). Beware of salt in butter if corn allergic (look for sea salt/unsalted), also be careful of the diet of the cows. Many of vegan butters have corn derivatives.
(2) Vegetable oil: Corn Allergy – Don’t use “vegetable oil” as it can be corn or soy oil. Canola oil is one of the worst oils for cross contamination with corn. I usually use grapeseed oil. Olive oil isn’t always 100% olive oil either, so if you are sensitive, be careful.
(3) Brown Sugar: Corn Allergy – depending on sensitivity, you may need to make your own with safe molasses and sugar. Alternatives include coconut palm sugar.
(4) Egg/Replacer: Corn allergy – Eggs are washed with a commercial cleaner that is full of corn products. The egg shells are porous and absorb the cleaner, so many with corn allergies have issues with eggs. Less common is to have issues with eggs due to what the chickens are eating. I have found that many of the egg replacers out there use corn starch, so beware which one you buy. Bob’s Red Mill works as a great replacer, however it has a lot of cross contamination and isn’t recommended at all with corn allergies. You could also use a flax egg as an alternative.
(5) Vanilla: Corn Allergy – Vanilla is made with alcohol, often corn, you may need to make your own
(6) Xanthan Gum: Corn Allergy  – xanthan gum is iffy with corn allergies due to how they make it. We made the switch to psyllium husk fibre in our house.
(7) Baking Powder: Corn & Grape Allergy – Baking powder is not corn free. Find corn-free if need be. Cream of tartar is made from grapes, if you have a grape allergy; you just need 1/4 of powder for baking soda and remainder in apple cider vinegar
(8) Salt: Corn Allergy – Many that are allergic to corn are sensitive to iodized salt as corn is used in the processing. Sea salt is better, but some are still quite sensitive and require brand specific salt.
(9) Coconut Milk: Corn allergy – ensure coconut milk is additive free
(10) Grease: Corn & Soy Allergy – PAM is full of contaminated corn oils and soy oil. I use safe oil & grease with my hands or a silicone brush. You can buy oil mister bottles and fill with your own safe oil as well.

Gluten Free Cinnamon Rolls

As with many things gluten free, so many say “This is the best recipe I have tried!” or “tastes just like the original”. It is frustrating to say the least. I have tried close to a dozen different cinnamon bun recipes and this is the best one I have tried by far.

I then made this recipe a good 5+ times. I have altered it a little each time. I think that it is the best it is going to get at this point.

Several tips I have, do not lament if you think, there is no way this recipe is going to work, it is so loose. The first time I actually made it I actually made a different batch after because I thought there is no way this is turning out. However when it came out of the oven I was pleasantly surprised! It is quite soft and as you can see in the photo below, the sides collapse down a bit as it is so soft. This moisture helps the cinnamon buns stay fluffy after they are baked. Most gluten free cinnamon rolls are quite dry, so this is pleasant change of pace.

Use the plastic wrap to help roll it, otherwise it won’t turn out as nice spirals. In addition, don’t roll the dough too thin. I did this once and found it was more like a cinnamon spiral cake. It baked together rather than having distinct layers that you can pull apart, which is the best part of cinnamon buns! Lastly, enjoy!

Gluten Free Cinnamon Rolls

  • Servings: 8
  • Print

These light, fluffy gluten free cinnamon rolls, can be prepared the night before.

Ingredients:
Dough:
2/3 C milk/milk alternative (I use coconut milk)
1 Tbsp butter/vegan butter (I use miyokos) (1)
1 packet (7g) yeast (2)
1/4 C granulated cane sugar
1/2 C potato starch
1/2 C brown rice flour
1/4 C fine ground almond flour
1/4 C tapioca starch plus more for flouring surface
1/2 tsp baking soda
3 T psyllium husk fibre (or 1 1/2 tsp xanthan gum) (3)
2 1/2 tsp baking powder (or 3/4 tsp baking soda + 1 1/2 tsp apple cider vinegar) (4)
1/2 tsp salt (5)
1 egg/flax egg – 1 Tbsp flaxseed meal, 2 Tbsp warm water (6)
1/4 C oil (olive oil, coconut oil etc)
1/2 tsp vanilla (7)

Filling:
1/3 C butter/vegan butter softened (1)
1/2 C brown sugar/coconut palm sugar
2 Tbsp cinnamon

Frosting:
2 T butter/vegan butter (1)
1 C powdered sugar (8)
1/2 tsp vanilla (7)
1 1/2 Tbsp hot water

Directions:

  1. Preheat oven to 350 degrees. Grease & lightly flour a pie plate (9)

Dough:

  1. Make flax egg, if using. Mix 1 Tbsp flax seed meal with 2 Tbsp warm water, sit for 5 min.
  2. Combine yeast & sugar in a mixer bowl.
  3. Microwave/heat milk and 1 Tbsp butter to approximately 110-115 degrees. Whisk into yeast mixture and set aside to proof.
  4. In a small bowl whisk together potato starch, brown rice flour, tapioca starch, almond flour, baking soda, psyllium husk fibre (or xanthan gum), baking powder (or baking soda if using) and salt.
  5. Once yeast is proofed add in egg, oil, and vanilla (and apple cider vinegar if using). Mix for a moment, begin slowly adding in the flour mixture. Increase speed to medium-high and beat for 1 1/2 minutes. Beating long enough is essential, GF flours are “thirsty”, the dough will thicken & lose it’s stickiness as you beat it. Note, it will still be quite wet and loose.
  6. Cover your surface with plastic wrap, coating lightly with tapioca starch. Place dough in center, sprinkling with more tapioca starch and another sheet of plastic wrap. Roll out to approximately 13″ x 10″. Carefully peel off the top layer of plastic wrap.

Filling:

  1. Use a knife or spatula to gently spread the softened butter over the dough evenly, leaving 1/2″ space around the edges.
  2. In a small bowl combine brown sugar & cinnamon. Sprinkle evenly over the dough.
  3. Roll the dough: start on the shorter sides, gently roll your dough into a log form using the plastic to “lift & roll” the dough. Try to make it as tight as possible, however don’t try to unroll it and retry, it is too sticky for that.
  4. Sprinkle lightly with tapioca starch again. Dip a sharp knife into tapioca starch & cut into 8 pieces.
  5. Place the rolls, cut side down, in a prepared pie plate. Cover with plastic wrap and tea towel, placing in a warm spot, rising for 15 minutes. (10)
  6. Bake 22-27 minutes until tops are golden brown

Icing:

  1. In a mixing bowl beat ingredients in a bowl. I use a hand crank whisk.
  2. Spread on top of cinnamon rolls 15-30 minutes after they are out of the oven. Enjoy

Notes:

(1) Butter: Dairy & Corn Allergy – Depending on allergies use whatever butter you need. There are several options: MELTEarth BalanceMiyoko’s, coconut oil, goat butter). Beware of salt in butter if corn allergic (look for sea salt/unsalted). Many of vegan butter have corn derivatives.
(2) Yeast: Corn allergy – avoid all yeast that contains any additives, most contain ascorbic acid, which is derived from corn. Red Star Active Dry Yeast is the only one that is free of any additives, it has to be the pack of 3 single packages.
(3) Xanthan Gum: Corn Allergy  – xanthan gum is iffy with corn allergies due to how they make it. We made the switch to psyllium husk fibre in our house.
(4) Baking Powder: Corn & Grape Allergy – Baking powder is not corn free. Find corn-free if need be. Cream of tartar is made from grapes, if you have a grape allergy; you just need 1/4 of powder for baking soda and remainder in apple cider vinegar
(5) Salt: Corn Allergy – Many that are allergic to corn are sensitive to iodized salt as corn is used in the processing. Sea salt is better, but some are still quite sensitive.
(6) Egg Replacer: Corn allergy – I have found that many of the egg replacers out there use corn starch, so beware which one you buy. Bob’s Red Mill works as a great replacer, however it has a lot of cross contamination and isn’t recommended at all with corn allergies. You could also use a flax egg as an alternative.
(7) Vanilla: Corn Allergy – Vanilla is made with alcohol, often corn, you may need to make your own
(8) Powdered sugar: Corn Allergy – Powdered sugar/icing sugar contains cornstarch to prevent clumping. Wholesome Organic Icing Sugar uses tapioca starch instead. This is an ok option for corn lite, but trial carefully as there is a lot of cross contamination. It is possible to make your own. This is what we do, it is just time consuming.
(9) Grease: Corn & Soy Allergy – PAM is full of contaminated corn oils and soy oil. I use safe oil & grease with my hands or silicone brush. You can buy oil mister bottles and fill with your own safe oil as well.
(10) Night before preparation: Once the rolls are in the pie plate, cover with plastic wrap and place in the fridge. In the morning set out at least 25 minutes before baking.

Gluten Free Frosted Sugar Cookies

Somehow, even though we had no company or travel, we were more busy than ever coming up to Christmas this year. This might have to do with a newborn in the house… This meant I didn’t get to Christmas baking before Christmas day. Instead, V and I made cookies on Boxing day, by that I mean I made the cookies, she helped pour some ingredients into the bowl and she selected the cookie cutters. Strangely our toddler didn’t want to cut the cookies out herself.

This cookie recipe I used to make years ago with the shortening that the recipe calls for. Since at this moment in time we don’t have a safe shortening I decided to tweak the recipe, and they turned out fantastic. So great, that I made a second batch yesterday because we ate all of them already.

You will notice one photo has decorated cookies while the rest are just white icing. The decorated cookies were from before our corn allergy diagnosis. I didn’t bother trying to add some natural food coloring to my icing this time around, however there are many ways to do this safely for different allergies. I may have to experiment.

Gluten Free Frosted Sugar Cookies

  • Servings: 2 dozen cookies
  • Print

This easy and delicious recipe is great for the holidays, birthdays or just any ordinary day. Enjoy!

Ingredients
For the Cookies:
1 C shortening/vegan butter (I use miyokos butter) (1)
1 C granulated cane sugar
1 large egg, cold/flax egg (allow to thicken for 5 min) (2)
1 Tbsp vanilla extract (3)
3 C Gluten Free All Purpose Flour Mix
1 tsp sea salt (4)
Tapioca starch for rolling out the dough

For the Frosting:
1/2 C vegan butter (1)
1/2 C shortening/vegan butter (1)
3 C icing sugar (5)
1 tsp vanilla extract (3)
1 Tbsp unsweetened coconut milk beverage
food coloring (optional) (6)
sprinkles (optional) (7)

Directions:
To make the Cookies:

  1. Preheat oven to 350 degrees, line baking sheets with silicone mats or parchment paper
  2. In the bowl of a stand mixer cream together the shortening/vegan butter and sugar until light & creamy (approximately 2 minutes). Mix in the egg & vanilla extract.
  3. Add the flour and salt, mix low speed until completely incorporated. The dough should be slightly firm but still pliable, not sticky.
  4. Separate into 2 balls. Flour working surface with tapioca starch. Roll out half the dough on floured surface. Cover with plastic wrap and roll out until it’s about 1/4 inch thick or less. Using desired shapes/cookie cutters, cut out cookies. Transfer carefully to cookie sheets, repeat with remaining dough. Dough scraps can be re-rolled. Use additional flour only as needed.
  5. If using vegan butter, refrigerate for 5 minutes before baking. Bake 8-14 minutes (all depends on size of cookie cutters & thickness of dough). Cool cookies on the baking sheet for a few minutes before cooling completely on a wire rack. Cool completely before frosting.

To make the Frosting:

  1. Mix the shortening, vegan butter & powdered sugar in the bowl of a stand mixer on low speed until the sugar is incorporated.
  2. Beat on medium-high for 1 minute.
  3. Mix in vanilla and milk until the frosting is light & fluffy, about 1 minute or less.
  4. Incorporate food coloring (optional)
  5. Frost the cookies, top with sprinkles (optional). Serve immediately or store in an airtight container until ready to serve

Notes:

(1) If using shortening in the dough it doesn’t need to be refrigerated, however if using vegan butter it bakes much better if chilled.
(2) Egg Replacer: Corn allergy – I have found that many of the egg replacers out there use corn starch, so beware which one you buy. Bob’s Red Mill works as a great replacer, however it has a lot of cross contamination and isn’t recommended at all with corn allergies. You could also use a flax egg as an alternative.
(3) Vanilla: Corn Allergy – Vanilla is made with alcohol, often corn, you may need to make your own
(4) Salt: Corn Allergy – Many that are allergic to corn are sensitive to iodized salt as corn is used in the processing. Sea salt is better, but some are still quite sensitive.
(5) Powdered sugar: Corn Allergy – Powdered sugar/icing sugar contains cornstarch to prevent clumping. Wholesome Organic Icing Sugar uses tapioca starch instead. This is an ok option for corn lite, but trial carefully as there is a lot of cross contamination. It is possible to make your own. This is what we do, it is just time consuming.
(6) Food coloring: Corn Allergy – coloring often in an alcohol base, usually corn. One can use natural coloring if desired. Beet root powder, matcha tea powder, etc.
(7) Sprinkles: Corn Allergy – made with corn starch and corn syrup, avoid if needed

Pancakes for Everyone

I have been making this recipe for almost 2 years and my family can’t get enough. I have made it many different ways with different flours, with and without eggs, different butter/oils etc. I hope you can enjoy these as much as my family does.

All-Around Pancakes

So this recipe is amazing. Somehow it works no matter what substitutes I have made to it. It seriously is the perfect recipe! I definitely recommend trying it.

Ingredients
1 1/2 C flour + more if needed, gluten free if needed (I use my Gluten Free No ‘Gum’ Flour Mix) (1)
3 1/2 tsp baking powder (or 1 tsp baking soda and 3 tsp apple cider vinegar) (2)
1 tsp sea salt
1 Tbsp cane sugar
1 1/4 C milk/milk replacer (I use light coconut milk)
1 egg/egg replacer (I use a flax egg [1 Tbsp flaxseed meal, 2 Tbsp warm water]) (3)
3 Tbsp butter/vegan butter/coconut oil, melted (I use miyokos butter) (4)

Directions

  1. Make flax eggs (omit if using regular eggs) in small bowl by combining flaxseed meal and water, mix and let sit for 5 min.
  2. In a large bowl whisk together flour, baking powder (or baking soda), salt and sugar. Make a well in center.
  3. Combine the milk, egg/egg replacer, melted butter/oil (and apple cider vinegar if using).
  4. Pour the liquid ingredients into the well in the dry ingredients, mixing until smooth. If using Gluten Free No ‘Gum’ Flour you will likely need to add an additional 1/4 C of flour so it isn’t too runny.
  5. Heat a lightly oiled griddle/frying pan over medium high heat. Pour or scoop batter onto the pan, about 1/4 C for each pancake. I make smaller pancakes for my toddler. Brown on both sides, serve hot and enjoy.
  6. Freeze extra pancakes in a sealed bag or container, reheat and enjoy

Notes
(1) Gluten Free Flour: Gluten allergy – If you are using a standard 1:1 gluten free flour mix, such as my Gluten Free All Purpose Flour, that has psyllium husk fibre/xanthan gum, it will cause your batter to be quite thick. You will need to spread the pancakes out on the pan. If using my Gluten Free No ‘Gum’ Flour, you will need to add an additional 1/4 C approximately.
(2) Baking Powder: Corn & Grape Allergy – Baking powder is not corn free. Find corn-free if need be. Cream of tartar is made from grapes, if you have a grape allergy; you just need 1/4 of powder for baking soda and remainder in apple cider vinegar
(3) Egg: Corn allergy – Eggs are washed with a commercial cleaner that is full of corn products. The egg shells are porous and absorb the cleaner, so many with corn allergies have issues with eggs. Less common is to have issues with eggs due to what the chickens are eating.
Egg Replacer: Corn allergy – I have found that many of the egg replacers out there use corn starch, so beware which one you buy.
(4) Butter: Dairy & Corn Allergy – Depending on allergies use whatever butter you need. There are several options: MELTEarth BalanceMiyoko’s, coconut oil, goat butter). Beware of salt in butter if corn allergic (look for sea salt/unsalted), also be careful of the diet of the cows. Many vegan butter have corn derivatives.

Gluten Free Tortillas and Why I Make My Own

Anyone that has tried gluten free tortillas knows that all the ones in the store are dry, the break & crumble, and honestly they don’t taste that great either.

I miss the soft texture that rolls and folds without cracking at the seams and breaking into pieces.

When we could no longer eat anything with xanthan gum in it, that meant that pretty much all store bought tortillas were off limits for our family. Unfortunately that also meant no more wraps, tacos or other delicious meals.

I tried a bunch of options, and I know there are other great recipes out there, but this one is super simple with minimal ingredients. It stays soft for 5 days in sealed container in the fridge, they only split from over stuffing and not from just folding it over. They are soft and have a similar texture to wheat tortillas. Are they exactly the same? No. But that’s ok. They are delicious.

I have tried this recipe plain as well as with Italian seasoning in it. I am planning on making a spinach tortilla and potentially a tomato flavored one in the future, I’ll be sure to update the recipe and let you know how they turn out!

Coconut Flour Tortilla

  • Servings: 6
  • Print

Ingredients
2 Tbsp psyllium husk fibre
1/2 C coconut flour
1 C lukewarm water
1 Tbsp oil (olive, coconut [melted] etc.) + 1 tsp to oil pan
1/4 tsp baking soda
1/4 tsp sea salt (optional)
1/2 tsp Italian seasoning or other flavoring (optional)

Directions
Make the dough

  1. In a medium mixing bowl combine psyllium husk fibre with coconut flour (ensure no lumps in coconut flour)
  2. Add the lukewarm water, oil and baking soda. Stir well with a spatula then knead well with your hands. Add in salt and seasoning if desired at this time (adding salt separate from baking soda to prevent deactivating the leavening agent).
  3. Knead for 1 minute. It will be quite moist and get dryer and softer as you work the dough. It shouldn’t be sticking to your hands at the end of the 60 seconds. If it is, add 1/2 tsp more psyllium husk at a time, kneading for 30 seconds and check consistency. It should still be moist but not sticking to your fingers and form a dough.
  4. Set aside for 10 minutes in the bowl. It should now be soft, elastic and well together.

Roll/Shape the tortilla

  1. Cut the dough into 4 even pieces, rolling each into a ball.
  2. Place one ball of dough between 2 pieces of parchment paper, rolling out to desired thickness. I roll mine to be 8 inches in diameter and to make 6 tortillas.
  3. Unpeel top layer of the parchment paper and use a lid/small plate to cut out a round tortilla. Keep the outside scrap to reform a ball and roll more tortillas. This extra dough makes roughly 2 more tortillas (to make 6 total).

Cook in non stick pan

  1. Warm a non stick pan (best to use a crepe/pancake pan, I use a normal frying pan) under medium high heat.
  2. Grease the pan with oil of choice (don’t leave drops of oil or the tortillas will fry)
  3. Flip the tortilla onto the pan and carefully remove the parchment paper. This can take some finesse/trial and error.
  4. Cook for 2-3 minutes on first side, flip using a spatula and cook for 1-2 more minutes on the other side.
  5. Place on a plate and use warm for tacos or allow to cool for a wrap later.
  6. Repeat the rolling/shaping and cooking steps for remaining tortillas. Ensure you grease the pan between each tortilla.
  7. Store in the fridge up to 5 days in sealed container or 3 days on the counter. Freeze if desired for long term storage.

I hope your family can enjoy these tortillas for tacos or for wraps, I know my family downs them.

Oat Waffles

I have used this recipe for quite some time and honestly they are absolutely fantastic. They are crispy on the outside and fluffy on the inside. The best part, only flour is oat! No mixing of flours! This makes it easy for others to accommodate for family with allergies I find.

This recipe isn’t huge, a single batch yields 3-4 round, 7 inch belgian waffles or 6 small, square belgian waffles. I often triple the recipe and freeze my leftovers to quickly warm up.

Oat Waffles

  • Servings: 6 Belgian-style waffles
  • Print

Ingredients
1 1/2 C oat flour, certified gluten free if necessary
2 tsp baking powder (or 1/2 tsp baking soda and 1 1/2 tsp apple cider vinegar) (1)
1/2 tsp salt (2)
Pinch of cinnamon (optional)
3/4 C room temperature milk of choice (we use light coconut milk)
1/4 C + 1 Tbsp melted coconut oil or 5 Tbsp unsalted butter, melted (we use Miyokos)
2 flax eggs (2 Tbsp flaxseed meal, 4 Tbsp warm water) or 2 large eggs
2 Tbsp maple syrup
1 tsp vanilla extract (3)

Directions

  1. Make flax eggs (omit if using regular eggs) in small bowl
  2. In a mixing bowl whisk the dry ingredients together: oat flour, baking powder (or baking soda), salt, and cinnamon.
  3. In another bowl whisk the wet ingredients: milk, melted coconut oil or butter, eggs, maple syrup, vanilla extract (and apple cider vinegar if using). If coconut oil solidifies on contact with cold ingredients gently heat the wet mixture in the microwave in 10 second intervals until melted again.
  4. Pour the wet ingredients into the dry ingredients. Stir with a spatula or spoon until just combined (it will still be slightly lumpy). Rest for 10 minutes (allows oat flour to absorb the moisture). Plug in the waffle iron to preheat now. Set dial to medium-high if temperature/browning dial (ours is setting 5)
  5. Once 10 minutes is completed, swirl batter one final time and pour batter into waffle iron & close the lid. Once the waffle is deeply golden and crispy transfer to a cooling rack or baking sheet. Don’t stack your waffles on top of each other or they lose their crispiness.
  6. Keep warm if desired in a 200 degree oven until ready to serve.
  7. Repeat with remaining batter
  8. Freeze leftover waffles in freezer safe plastic bags, place in toaster or microwave to warm up to eat.

Notes
(1) Baking powder: Corn & Grape Allergy – Baking powder is not corn free. Find corn-free if need be. Cream of tartar is made from grapes, if you have a grape allergy; you just need 1/4 of powder for baking soda and remainder in apple cider vinegar
(2) Salt: Corn Allergy – Many that are allergic to corn are sensitive to iodized salt as corn is used in the processing. Sea salt is better, but some are still quite sensitive.
(3) Vanilla: Corn Allergy – Vanilla is made with alcohol, often corn, you may need to make your own

Granola Bars

I am excited to share one of our favorite snacks in our house. Granola bars. Simple, easy and so versatile. It is so easy to change this recipe to suite dietary restrictions and preferences. I have yet to make these nut free, but I am sure you could just do more rolled oats in place of the nuts and it would turn out perfect. As long as you balance the dry with the liquid, these will turn out fantastic!

For this recipe, there is a base recipe, and then there are your optional add-ins. I have decided to separate and make it two separate recipes, so make sure you don’t just print or look at the Mix-Ins portion!

What the mix should look like when pressing into pan
Cooled at least 2 hours in the fridge (this was overnight)
What they look like sliced and ready to eat

Base Granola Bar Recipe

  • Servings: 16 bars
  • Print

Ingredients

2 1/2 C old fashioned rolled oats
1/2 C nuts, roughly chopped (1)
1/4 C honey (2)
1/4 C unsalted butter (or alternative, we use miyokos) (3)
1/3 C brown sugar/coconut palm sugar (4)
1 tsp vanilla extract (5)
1/4 tsp salt (6)
3/4 C total extra mix-ins (see Mix Ins – Granola Bar Recipe below)

Directions

  1. Preheat oven to 350 degrees. Line 9 inch square baking dish with parchment paper, make big enough to completely fold over the top of the tray
  2. Place the oats & nuts on a baking sheet and bake for 8-10 min until lightly toasted, place in large bowl.
  3. While oats are toasting, add the honey, butter & brown sugar to a small saucepan. Cook over medium heat until butter is melted and the sugar is dissolved, stir occasionally.
  4. Remove from heat & stir in vanilla and salt.
  5. Pour over the oat mixture, stir to combine. Add mix-ins, except chocolate & mix well to ensure well coated.
  6. If adding chocolate, wait about 15 minutes for the mixture to cool slightly, then combine.
  7. Place in prepared baking sheet. Using a rubber/silicone spatula press the mixture into the pan, spreading around evenly. Fold parchment over & press with your whole body weight to ensure it is well compressed throughout.
  8. Chill for at least 2 hours or overnight. Remove from pan by lifting parchment, place on cutting board and cut to desired shapes with sharp knife. Allowing to warm for several minutes before slicing can ensure cleaner lines. Enjoy
  9. Store in sealed package. If sticking together, separate with plastic or parchment. Refrigerate or freeze extras and remove as needed every couple of days.

Notes

(1) Nuts: Corn Allergy – depending on how they are pasteurized, pest control, processed/washed & cross contamination in facilities as well as in the store are all things to consider if quite sensitive.
(2) Honey: Corn Allergy – Purity of the honey itself is important to ensure. Some beekeepers use corn syrup as a supplemental food in the winter months, getting cross contaminated with sourced honey. Sprays for illness, proximity to corn fields & whether the honeycombs are made of corn wax instead of beeswax all need to be considered.
(3) Butter: Dairy & Corn Allergy – Depending on allergies use whatever butter you need. There are several options: MELTEarth BalanceMiyoko’s, coconut oil, goat butter). Beware of salt in butter if corn allergic (look for sea salt/unsalted). Many of vegan butter have corn derivatives.
(4) Brown Sugar: Corn Allergy – depending on sensitivity, you may need to make your own with safe molasses and sugar. Alternatives include coconut palm sugar.
(5) Vanilla: Corn Allergy – Vanilla is made with alcohol, often corn, you may need to make your own
(6) Salt: Corn Allergy – Many that are allergic to corn are sensitive to iodized salt as corn is used in the processing. Sea salt is better, but some are still quite sensitive and require specific safe brands

Mix-Ins - Granola Bar Recipe

  • Servings: 16 bars
  • Print

Directions
Select the desired type of granola bar from the “Mix-Ins” recipe and add to Base Granola Bar Recipe as desired. The nut option is the 1/2 C described in the base recipe. These are only suggestions that we use, change to your hearts content.

Mix-Ins
Strawberry: Master + almond + 1/2 C dried strawberries + 1/4 C shredded coconut + 1/2 tsp cinnamon (add with vanilla) + 2 Tbsp chia seeds [optional]

Blueberry: Master + almond + 1/2 C dried blueberries + 1/4 C shredded coconut

Dark Chocolate: Master + pecans + 1/2 C dried cherries + 1/4 C mini chocolate chips

Tropical: Master + cashew + 1/2 C chopped dried fruit (pineapple, mango, orange, peach) + 1/4 C shredded coconut

White Chocolate Cranberry: Master + almond + 1/4 C dried cranberries + 1/4 C sunflower seeds + 1/4 C white chocolate chips

Peanut Butter Chocolate: Master + 1/4 C peanut butter (add with vanilla) + 1/2 C M&Ms + 1/4 C mini chocolate chips

Sunflower Almond: Master + almond + 1/2 C sunflower + 1/4 C shredded coconut + 1/2 tsp cinnamon (add with vanilla)

Sunflower Chocolate Almond: Master + almond + 1/4 C sunflower + 1/4 C shredded coconut + 1/4 C chocolate chips

How I package to go into the freezer. Just pull out a few at a time to put in a bag or container on the counter, allow to warm to room temperature and enjoy!

I hope that your families can enjoy these as much as we do!

Chicken Souvlaki Wraps

I used to work at OPA, the fast food restaurant, when I was younger, and even though I couldn’t eat their pita wraps, I salivated over them daily. I just never considered making my own.

You could just make the chicken souvlaki from this recipe, as it is pretty delicious, but I recommend trying it in a wrap as well!

Chicken Souvlaki Wraps

  • Servings: 10-12 skewers
  • Print

Ingredients

Souvlaki Chicken

2 1/2 lbs boneless skinless chicken breast cut into 1″ cubes
10 garlic cloves, peeled
2 Tbsp dried oregano
1 tsp dried rosemary
1 tsp paprika
1 tsp sea salt
1 tsp black pepper
1/4 C olive oil or coconut oil
1/4 C dry white wine or apple cider vinegar
Juice of 1 lemon
2 bay leaves

Pita Fixings

Pita bread (I used my Grain Free Garlic Rosemary Flatbread)
Tzatziki sauce (I didn’t use any sauce and it still tasted delicious)
Fresh veggies (tomatoes, cucumber, onions, olives, lettuce, spinach, radish, peppers etc.)

Directions

  1. In a small food processor, add garlic, oregano, rosemary, paprika, salt, pepper, oil, wine/vinegar & lemon juice (do NOT add the dried bay leaves at this point). Pulse until well combined.
  2. Place chicken in a bowl, add the bay leaves. Add the marinade & mix well. Cover and refrigerate for 2 hrs or overnight. I used our marinating food processor adapter.
  3. Soak 10-12 wooden skewers in water for 30-45 minutes.
  4. When ready, thread marinated chicken onto the prepared skewers.
  5. Prepare grill, brush the grates with a little oil and heat over medium-high heat. Place chicken on the grill until well browned & internal temperature register 155 degrees F. Be sure to turn skewers evenly to cook on all sides.
  6. Let rest for 3 minutes & serve. (Take chicken off skewers if making a wrap.